SEO Image Optimization Checklist for Developers
Introduction
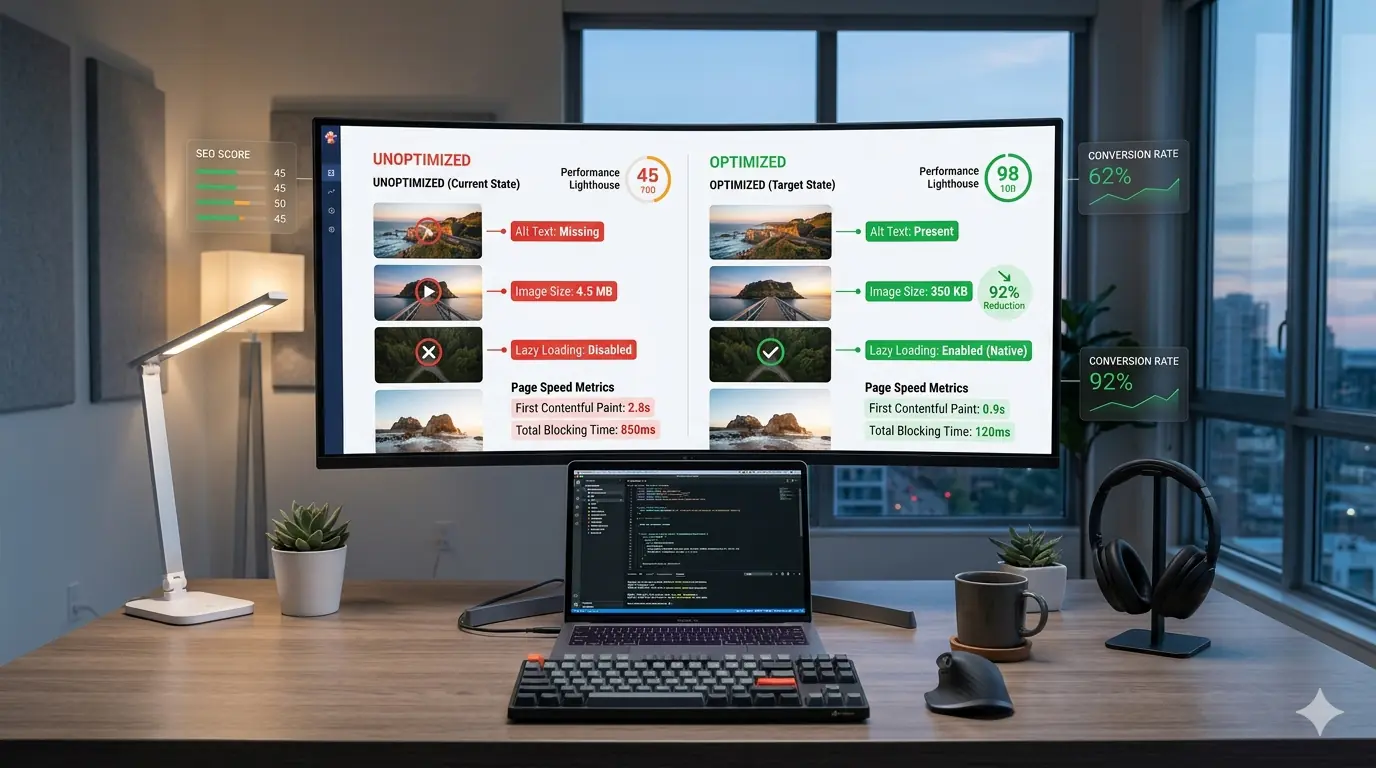
Images play a significant role in modern web experiences. They help explain complex ideas, improve visual storytelling, and enhance engagement across websites and applications. However, poorly optimized images are one of the most common causes of slow websites and poor search performance.
For developers building modern web applications, understanding image SEO is no longer optional. Search engines increasingly rely on visual signals, page performance metrics, and structured image data to understand content and rank websites.
Properly optimized images improve search rankings, page speed and Core Web Vitals, user engagement, and image search visibility.
This guide provides a practical SEO image optimization checklist for developers, covering everything from alt text and image size to lazy loading and modern formats. Developers already familiar with why image optimization is critical for SEO in 2026 will find this checklist a natural companion — translating principles into a step-by-step deployment workflow.
As Google's web performance team often emphasizes:
"Images are often the largest assets on a page. Optimizing them correctly is one of the fastest ways to improve web performance and user experience."
Why Image SEO Matters for Modern Websites
Search engines have become increasingly sophisticated in how they interpret images. Previously treated as simple visual assets, images today contribute to page speed performance, semantic content understanding, visual search results, and AI-driven search interpretation.
Modern search algorithms analyze image signals including file size, format efficiency, contextual placement, alt text descriptions, and structured metadata. Large unoptimized images can severely impact Core Web Vitals — particularly Largest Contentful Paint (LCP), Cumulative Layout Shift (CLS), and Total Blocking Time (TBT). These performance metrics directly influence SEO performance and user experience.
Understanding how image optimization improves Core Web Vitals is foundational to building a consistent image workflow that supports both rankings and load performance.
The Developer's Image SEO Checklist
Before deploying images to production websites, verify each item below. Following this checklist ensures images support both search engine visibility and web performance optimization.
- Choose the correct image format
- Reduce image size using compression
- Provide descriptive alt text
- Implement responsive image delivery
- Enable lazy loading for offscreen images
- Use appropriate dimensions to prevent layout shift
- Compress images without visible quality loss
- Use modern formats like WebP or AVIF
- Maintain consistent file naming conventions
Step 1: Choose the Right Image Format
Selecting the correct format is the foundation of effective image SEO. Different formats serve different purposes, and choosing the wrong one is one of the most common mistakes developers make before images ever reach the browser.
JPG is best for photographs and complex images. JPG files support strong compression but do not support transparency.
PNG is best for graphics, icons, and images requiring transparency — but PNG files tend to be significantly larger than equivalent JPGs for photographic content.
WebP is widely supported across all modern browsers and offers superior compression compared to both JPG and PNG, making it the recommended default for web delivery in 2026.
AVIF offers even better compression efficiency than WebP, though browser support is still expanding. For production use, serving AVIF with a WebP fallback covers the broadest device range.
For a detailed breakdown of when each format is the right choice, the JPG vs PNG vs WebP format comparison covers real-world use cases with specific file size examples.
Step 2: Optimize Image Size Before Upload
Large images dramatically slow websites. Many developers upload images directly from design tools without resizing them first — a common workflow gap that carries an outsized performance cost.
For example, an exported design image at 4000px width displayed at 1200px wastes bandwidth and increases load time for every visitor. Practical size targets for most web contexts are:
- Blog images: 1200px width
- Thumbnails: 300–600px
- Hero images: 1600–2000px
Reducing image dimensions before uploading is one of the most effective ways to improve web performance because it reduces file size at the source, before any compression is applied. Developers who understand the most common image optimization mistakes consistently identify oversized dimensions as the most frequent and most avoidable issue.
Step 3: Use Efficient Image Compression
Image compression reduces file size while preserving visual quality. There are two primary approaches, and the right choice depends on the image type.
Lossy compression reduces file size significantly but slightly alters image data. It is best for photos, blog images, and product images where a small, imperceptible quality reduction is acceptable in exchange for meaningful file size savings.
Lossless compression preserves original image quality while removing unnecessary metadata. It is best for graphics, logos, and icons where pixel-perfect accuracy matters.
Developers often combine both techniques — lossless for UI assets, lossy for photography. The complete guide to image compression without quality loss covers both methods in depth, including how to set compression levels that maintain visual quality across different formats.
Step 4: Write Descriptive Alt Text
Alt text plays a critical role in image SEO. Search engines rely on it to understand the meaning of an image — and screen readers depend on it to describe images to users who cannot see them. Both use cases matter and both reward the same behaviour: accuracy and specificity.
Good alt text describes the visual content, includes relevant keywords naturally, and provides accessibility support for screen readers. Avoid keyword stuffing. Focus on clarity and context.
Bad alt text:
image1.jpg
Better alt text:
developer optimizing images for faster website performance
Best alt text:
frontend developer compressing images to improve website page speed
The improvement from generic to specific is not about length — it is about precision. An alt attribute that accurately describes what is in the image will always outperform a stuffed keyword list.
Step 5: Implement Lazy Loading
Lazy loading delays loading images until they appear in the viewport. This reduces initial page load time and improves Core Web Vitals by deferring the network cost of offscreen images until they are actually needed.
Modern browsers support native lazy loading using the loading attribute — no JavaScript library required:
<img src="image.webp" loading="lazy" alt="optimized website image">
Lazy loading is particularly useful for blog images, product galleries, and any image-heavy page where most images start below the fold. The complete beginner guide to lazy loading images covers implementation patterns, common mistakes, and how to avoid lazy loading images that are in the initial viewport — a frequent error that actually degrades LCP.
Step 6: Use Responsive Images
Responsive images ensure the correct image size is delivered to each device. Serving a 1600px image to a 375px mobile screen wastes bandwidth and slows load time. The srcset attribute solves this by letting the browser select the most appropriate size:
<img
  src="image-800.webp"
  srcset="image-400.webp 400w,
          image-800.webp 800w,
          image-1200.webp 1200w"
  sizes="(max-width: 768px) 100vw, 800px"
  alt="responsive optimized image">
Benefits include reduced bandwidth usage, faster mobile load times, and improved Lighthouse score. Responsive images are critical for mobile-first SEO — Google indexes the mobile version of pages first, making mobile image performance a direct ranking factor.
Step 7: Prevent Layout Shift with Fixed Dimensions
One of the most common web performance errors is failing to define image dimensions. Without explicit width and height attributes, browsers cannot reserve layout space before images load. This causes Cumulative Layout Shift (CLS) — content jumping as images appear — which directly penalises Core Web Vitals scores.
Always define width and height on every <img> element:
<img src="image.webp" width="1200" height="800" alt="optimized website image">
This prevents unexpected page movement during loading and is one of the fastest single-attribute fixes available for improving CLS scores.
Step 8: Use Browser-Based Image Tools
Browser-based image tools process images locally without uploading them to external servers. This approach offers improved privacy, faster processing, and no file upload latency — making them increasingly the preferred choice for developers who optimize images as part of their pre-deployment workflow.
Client-side tools convert, compress, and resize images directly in the browser using Canvas API and WebAssembly — the same architecture that powers MeloTools' free image converter. For developers who need a browser-based workflow that requires no account and handles batch processing, this approach removes the friction of server-dependent tools.
Step 9: Optimize Images for Core Web Vitals
Images heavily influence Largest Contentful Paint (LCP). The largest image element on a page — typically the hero image — is almost always the LCP element, which means it is the single most important image to optimize on any page.
To improve LCP: compress the hero image aggressively, preload it so the browser discovers it early, use a modern format, and avoid oversizing the asset. The rel="preload" hint is particularly effective for hero images because it moves image discovery earlier in the loading sequence:
<link rel="preload" as="image" href="hero-image.webp">
For a full breakdown of how each image optimization technique maps to specific Core Web Vitals improvements, the image optimization guide for Core Web Vitals covers LCP, CLS, and INP with before-and-after metric examples.
Step 10: Maintain Consistent File Naming
File names contribute to image SEO. Search engines read file names as a signal for image content, making descriptive names a low-effort SEO improvement that many developers overlook.
Avoid generic file names:
IMG_203948.png
Use descriptive, hyphen-separated names instead:
website-image-optimization-checklist.webp
Consistent naming also makes image assets easier to manage in version control and simplifies the process of auditing image usage across large codebases.
Common Image SEO Mistakes Developers Make
Many websites still suffer from avoidable optimization mistakes: uploading uncompressed images, ignoring responsive image sizing, missing alt text, serving oversized images, and failing to implement lazy loading. These mistakes often compound — a page with missing alt text, no lazy loading, and full-resolution images has three separate SEO and performance penalties rather than one.
The top image optimization mistakes developers make covers each of these patterns with specific examples, including the subtle mistakes that Lighthouse scores often miss but that still affect real-world performance.
Developer Workflow: Putting It All Together
A practical image optimization workflow before deployment:
- Export images from design tools at 2x the target display size
- Resize images to final layout dimensions
- Compress using a browser-based tool — lossy for photos, lossless for graphics
- Convert to WebP (with AVIF for modern browsers where supported)
- Upload optimized images to the website
- Implement responsive
srcsetmarkup with asizesattribute - Add descriptive, accurate alt text to every
<img>element - Add
loading="lazy"to all images below the fold - Add explicit
widthandheightto every image element - Use
rel="preload"on the hero image
This workflow ensures images support both SEO performance and web speed optimization from the first deployment rather than requiring a retroactive audit.
The Future of Image SEO
Search engines are increasingly moving toward AI-powered visual understanding. This means image optimization will involve more than compression and correct formats — contextual relevance, visual similarity detection, AI-based image indexing, and multimodal search interpretation are all becoming measurable signals.
Understanding how images appear in AI search results is increasingly relevant for developers building content that needs to perform not just in traditional search but in the AI-generated answers that now appear above organic results for many queries.
Developers who follow structured image optimization practices today will be better positioned for these changes — because the fundamentals (correct format, accurate alt text, fast load, descriptive context) are the same signals AI search engines rely on.
Final Thoughts
Image optimization is one of the most impactful improvements developers can make to a website. A well-optimized image strategy improves search visibility, page speed, user experience, and website performance — and most of the gains come from consistent application of the checklist above rather than any single advanced technique.
The goal is straightforward: deliver images that are smaller, faster, and more informative for search engines. When images are optimized correctly, they stop being a performance burden and become a strategic advantage for SEO.