Image Optimization for WordPress: Complete 2026 Guide
Images are the single largest contributor to slow WordPress sites in 2026. The average WordPress page carries 2.1 MB of image payload — and unoptimised images are directly responsible for failing Core Web Vitals scores, poor Largest Contentful Paint times, and suppressed search rankings. The good news is that image optimization for WordPress is one of the most impactful improvements a site owner can make, and the majority of it requires no developer.
This guide covers the complete WordPress image optimization workflow for 2026 — from upload settings and format selection to compression plugins, WebP delivery, and the specific Core Web Vitals fixes that Google's quality systems measure.
Why WordPress Sites Struggle With Image Performance
WordPress makes it easy to upload images and harder to optimise them by default. Several platform-level behaviours create image performance problems that most site owners do not realise exist:
WordPress generates multiple image sizes automatically. When you upload a single image, WordPress creates up to seven additional scaled versions — thumbnail, medium, medium-large, large, and any custom sizes your theme or plugins define. These scaled versions are stored even when they are never displayed, and themes frequently load larger versions than necessary.
Default JPEG quality is 82. WordPress applies a default compression quality of 82 to all resized images. This is a reasonable default but it is applied uniformly — a simple graphic that could be compressed to quality 60 without visible degradation receives the same treatment as a complex photograph where quality 82 is genuinely needed.
Plugins add their own image sizes. WooCommerce, page builders like Elementor and Divi, gallery plugins, and social sharing plugins all register custom image sizes. A typical WordPress installation with five active plugins generates 12–20 image size variants per upload. Most of these are never used.
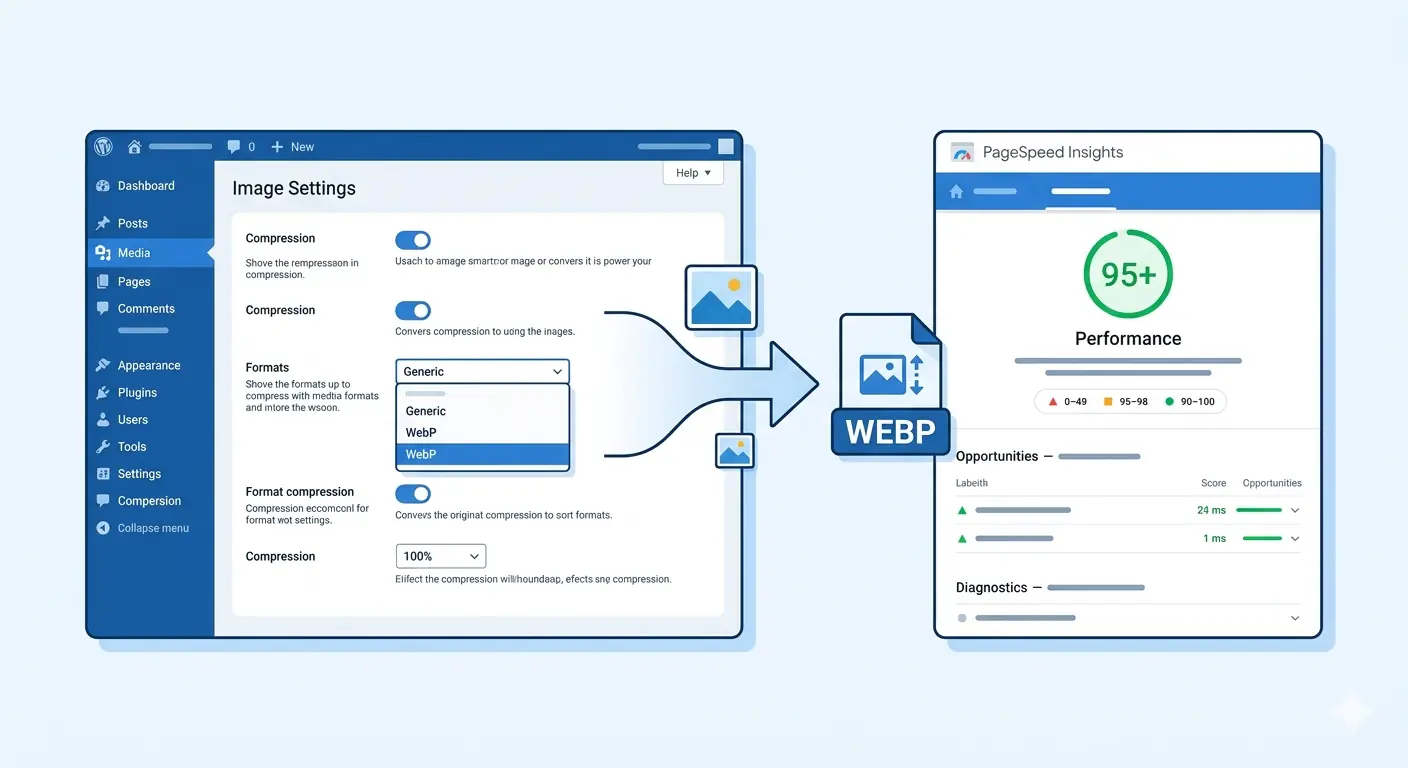
No WebP delivery by default. WordPress core added native WebP upload support in version 5.8 (2021), but it does not convert existing JPEG and PNG images, and it does not serve WebP automatically to browsers that support it without additional configuration.
Understanding these defaults is the starting point for every optimisation decision below.
Step 1 — Audit Your Current Image Performance
Before making any changes, establish a baseline. This tells you exactly how much image weight you are carrying and which pages are most affected.
Run Google PageSpeed Insights on your homepage and top 3 landing pages. Go to pagespeed.web.dev, paste each URL, and look specifically for these image-related opportunities in the results:
- "Serve images in next-gen formats" — shows how many KB could be saved by converting to WebP or AVIF
- "Properly size images" — shows images being loaded at larger dimensions than displayed
- "Efficiently encode images" — shows over-compressed or under-compressed images
- "Defer offscreen images" — shows below-the-fold images loading before they are needed
- "Largest Contentful Paint element" — identifies which image is causing your LCP score
Note the exact KB savings suggested for each opportunity — this prioritises which fixes produce the biggest performance gain.
Check your LCP score specifically. For WordPress Core Web Vitals images, LCP is the most directly affected metric. An LCP above 2.5 seconds is a ranking signal failure. The LCP element on most WordPress pages is either the hero image, the featured image in a blog post, or a large background image set via CSS.
Step 2 — Choose the Right Image Format for WordPress
The best image format for WordPress in 2026 depends on the content type — there is no single correct answer for all images across a site.
| Content type | Recommended format | Why |
|---|---|---|
| Hero images | WebP (lossy) | 25–35% smaller than JPEG, supported by all modern browsers |
| Featured blog images | WebP (lossy) | Directly affects LCP — smaller file = faster LCP |
| Product photography | WebP (lossy) or AVIF | Maximum quality at minimum file size |
| Logos | SVG or lossless WebP | Vector or pixel-perfect output |
| Icons | SVG | Resolution-independent, no file size cost |
| Screenshots | Lossless WebP or PNG | Text clarity requires lossless compression |
| Transparent graphics | Lossless WebP | Replaces PNG with 26% smaller files |
| Background patterns | WebP (lossy) | High compression tolerance |
WebP is the correct default format for the majority of WordPress image content in 2026. Browser support is approximately 96–97% of global traffic — Chrome, Edge, Firefox, Safari, and all major mobile browsers. The remaining browsers receive JPEG or PNG fallbacks automatically when served via the <picture> element or a WebP-serving plugin.
For the definitive format selection guide including AVIF, see the best image format for web in 2026 comparison covering all modern formats with specific file size benchmarks.
Step 3 — Optimise Images Before Uploading to WordPress
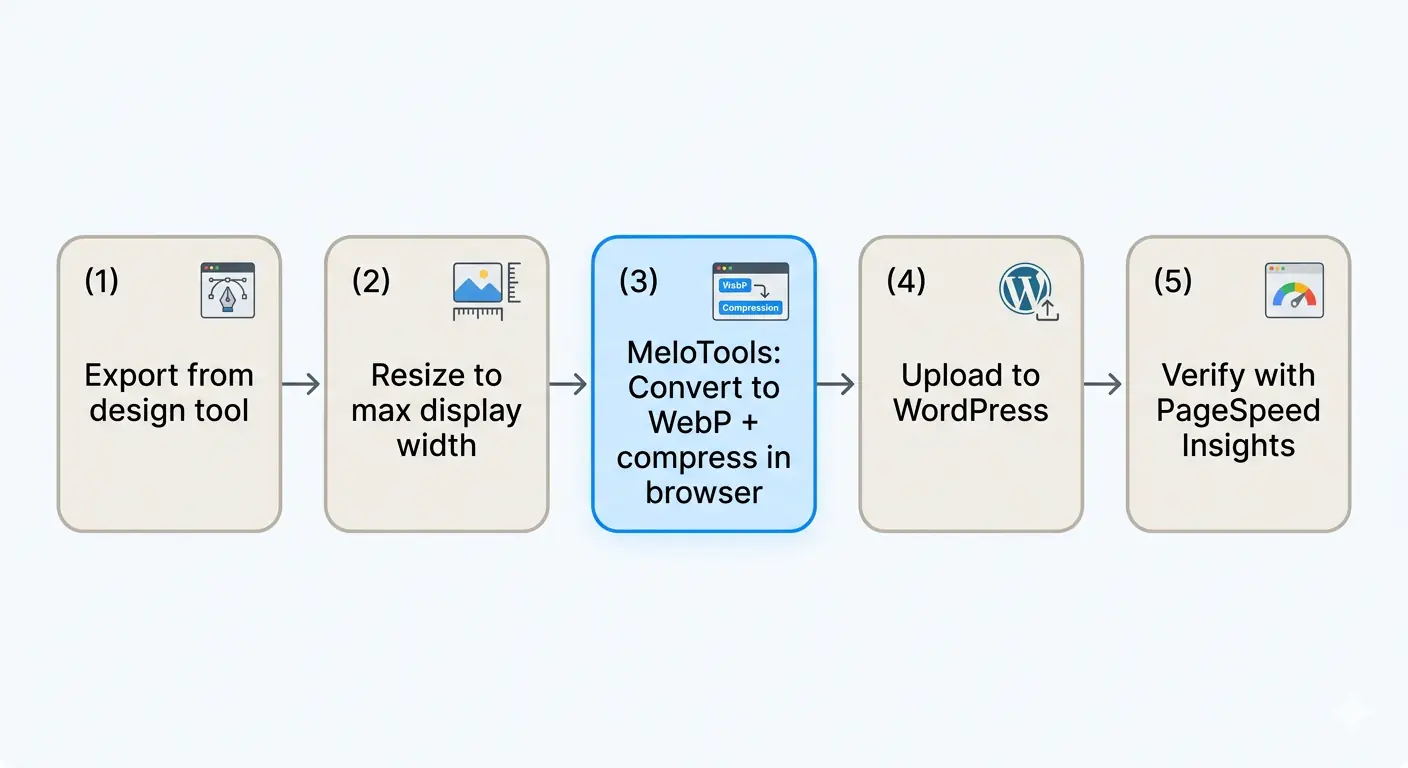
The most impactful step in the entire WordPress image optimization workflow is one that happens before the WordPress Media Library is involved at all. Images compressed and converted before upload produce smaller files, generate smaller scaled variants, and reduce the storage impact of all automatically generated sizes.
The pre-upload workflow:
- Export your image from Figma, Canva, Photoshop, or your camera at the highest quality
- Resize to the maximum display width — most WordPress themes display content at 1200px or less. A 4000px wide photograph scaled down in CSS still transfers 4000px of pixel data
- Compress and convert to WebP using MeloTools image converter — drag and drop your JPEG or PNG, select WebP output, download
- Compress to the appropriate quality using MeloTools image compressor — Balanced preset (quality 80) for photographs, Minimal (quality 95) for hero images and LCP candidates
- Upload the compressed WebP to WordPress
This workflow runs entirely in the browser — no file uploads, no server processing, files never leave your device. For agencies handling client images or teams with brand asset restrictions, this matters operationally.
A typical hero image from a camera or design tool starts at 3–6MB. After resize to 1200px, conversion to WebP at quality 80, it is typically 120–280KB — a 90–95% reduction before WordPress even processes it.
Step 4 — WordPress Media Settings
Several WordPress core settings directly affect image performance. These are in Settings → Media in the WordPress admin:
Image sizes — reduce or disable unused sizes
WordPress default sizes:
- Thumbnail: 150×150px (cropped)
- Medium: 300×300px (max)
- Medium Large: 768px wide
- Large: 1024×1024px (max)
Your theme likely adds additional sizes. Go to Appearance → Theme File Editor or use a plugin like Regenerate Thumbnails to see all registered sizes. Disable any size that is never displayed on the front end.
Add this to your theme's functions.php to remove unused default sizes:
// Remove unused default WordPress image sizes
add_filter( 'intermediate_image_sizes_advanced', function( $sizes ) {
    unset( $sizes['medium_large'] ); // Remove if your theme doesn't use it
    return $sizes;
});
Maximum upload file size
WordPress itself does not set the upload limit — your hosting provider's PHP configuration does (upload_max_filesize and post_max_size). If your hosting forces files under 2MB, the pre-upload workflow above (compressing before upload) becomes even more important.
Big Image Size Threshold
Since WordPress 5.3, images wider than 2560px are automatically scaled down on upload via a "big image size threshold." This is sensible behaviour but it processes images server-side after upload. If you are following the pre-upload compression workflow, you can disable this threshold since your images will already be correctly sized:
// Disable big image size threshold if pre-compressing before upload
add_filter( 'big_image_size_threshold', '__return_false' );
Only add this if you are consistently pre-compressing images. Without it, large accidental uploads will be scaled down automatically.
Step 5 — WebP for WordPress in 2026
WebP WordPress delivery works differently depending on your hosting and plugin setup.
Option A — Serve WebP via a caching or optimisation plugin (recommended for most sites)
Plugins like Imagify, ShortPixel, and Smush generate WebP versions of all existing images and serve them automatically to supported browsers. They handle the browser detection and <picture> element wrapping without any theme code changes.
The free tiers:
- Imagify: 20MB free per month — sufficient for small sites, very limited for active blogs
- ShortPixel: 100 images free per month — adequate for initial optimisation of a small site
- Smush: WebP conversion available only on the paid Pro plan — free tier does not include WebP
For sites with existing image libraries over 100 images, the free tiers of optimisation plugins are insufficient for bulk conversion. The correct approach is to pre-convert images using MeloTools before upload (zero cost, unlimited) and use a lightweight caching plugin for WebP serving rather than a compression plugin.
Option B — Serve WebP via your CDN (best performance)
If your WordPress site uses Cloudflare (free tier available), Cloudflare automatically converts eligible images to WebP when the Polish feature is enabled — available on paid plans only. For free Cloudflare users, the caching layer still provides significant performance benefit without WebP conversion.
If you use BunnyCDN, KeyCDN, or similar, WebP transformation is typically included and applied via URL parameters.
Option C — Serve WebP via .htaccess (Apache servers only)
For Apache-hosted WordPress sites, add the following to your .htaccess file to serve .webp versions of images automatically when the file exists and the browser supports it:
<IfModule mod_rewrite.c>
  RewriteEngine On
  RewriteCond %{HTTP_ACCEPT} image/webp
  RewriteCond %{REQUEST_FILENAME} \.(jpe?g|png)$
  RewriteCond %{REQUEST_FILENAME}.webp -f
  RewriteRule ^(.+)\.(jpe?g|png)$ $1.$2.webp [T=image/webp,E=accept:1]
</IfModule>
This serves the .webp version of any image when the browser sends an Accept: image/webp header and a corresponding .webp file exists in the same directory. Combined with bulk WebP conversion of your uploads folder, this is the zero-plugin, zero-cost solution for Apache servers.
Step 6 — The WordPress Image Compression Plugin Decision
The wordpress image compression plugin decision comes down to whether you are optimising existing images (bulk) or optimising going forward (new uploads). The workflows are different.
For existing image libraries:
Use ShortPixel or Imagify for bulk compression of existing uploads. Both offer pay-as-you-go credit models for one-time bulk optimisation — typically $0.005–$0.01 per image. A site with 500 images costs $2.50–$5.00 to fully optimise as a one-time operation.
For ongoing new uploads:
Pre-compress before uploading using MeloTools (free, unlimited, browser-based) and install a lightweight plugin only for WebP serving, not compression. WP Rocket's WebP serving or a dedicated WebP plugin handles the delivery layer without the overhead of running a compression service on every upload.
Plugin comparison for WordPress image optimization:
| Plugin | Compression | WebP | Free tier | Best for |
|---|---|---|---|---|
| Imagify | Yes | Yes | 20MB/month | Small sites, occasional uploads |
| ShortPixel | Yes | Yes | 100 images/month | Initial bulk optimisation |
| Smush | Yes | Pro only | Unlimited lossless | Sites avoiding WebP |
| EWWW Image Optimizer | Yes | Yes | Free with limits | Self-hosted/API-free option |
| Fly Dynamic Image Resizer | No | No | Free | Removing unused image sizes |
| WP Rocket | No | Serving only | No | Performance-focused sites |
The most cost-effective setup for a WordPress site publishing content regularly is: pre-compress in MeloTools before upload + EWWW Image Optimizer free for any images that bypass the pre-upload workflow + WebP serving via .htaccess or CDN.
Step 7 — Fix WordPress Core Web Vitals Images
WordPress core web vitals images failures fall into four specific categories. Each has a distinct fix.
Fix 1 — Hero image not loading fast enough (LCP failure)
The hero image on your homepage or post featured images is typically the LCP element. Two WordPress-specific causes:
- Theme loads the hero via CSS
background-image— these cannot receiveloading="eager"orfetchpriority="high"attributes. Replace CSS background images with an<img>element where possible - Theme uses
loading="lazy"on above-the-fold images — this is the most common WordPress LCP mistake. The WordPress lazy loading implementation added in version 5.5 applies lazy loading broadly. Add this to your theme to disable lazy loading on the first image:
// Remove lazy loading from the first image on page (LCP fix)
add_filter( 'wp_lazy_loading_enabled', function( $default, $tag_name, $context ) {
    // Logic to identify first image — use a theme-specific implementation
    return $default;
}, 10, 3 );
Or use the fetchpriority="high" attribute on the hero image specifically, which overrides lazy loading behaviour regardless of the attribute present.
- Hero image is over 200KB — pre-compress to under 150KB using the workflow in Step 3. A properly optimised 1200px WebP hero image should be 80–180KB depending on complexity.
Fix 2 — Images not properly sized (layout shift / CLS)
Missing width and height attributes on <img> tags cause Cumulative Layout Shift — the browser does not know the image dimensions until it loads, so content jumps as images appear. WordPress added automatic width and height attributes in version 5.5 for images inserted via the block editor. If your theme or page builder outputs images without these attributes:
// Force width and height attributes on all WordPress images
add_filter( 'wp_get_attachment_image_attributes', function( $attr, $attachment ) {
    if ( empty( $attr['width'] ) || empty( $attr['height'] ) ) {
        $meta = wp_get_attachment_metadata( $attachment->ID );
        if ( $meta ) {
            $attr['width']  = $meta['width'];
            $attr['height'] = $meta['height'];
        }
    }
    return $attr;
}, 10, 2 );
Fix 3 — Images loading from slow server (TTFB affecting LCP)
If your images are served directly from WordPress hosting rather than a CDN, every image request goes to the same server as your HTML. On shared hosting this creates a bottleneck. Move image delivery to a CDN — Cloudflare free tier caches static assets including images on its global network with no configuration beyond adding your site.
Fix 4 — Too many images loading per page (total page weight)
Category pages, shop pages, and blog archives frequently load 20–40 images simultaneously. Use lazy loading for all below-the-fold images (which WordPress does by default since 5.5) and check that your theme is not loading full-size images where thumbnails would suffice.
Step 8 — Responsive Images in WordPress
WordPress generates srcset attribute values automatically for all images uploaded through the Media Library. The srcset tells the browser which image size to load based on the device's screen width and pixel density.
Confirm your theme's images are using srcset by inspecting any <img> element — it should have both srcset and sizes attributes. If they are missing, your theme is bypassing the WordPress image functions. The correct WordPress function for outputting a responsive image:
// Correct — outputs with srcset and sizes attributes
echo wp_get_attachment_image( $attachment_id, 'large' );

// Incorrect — bypasses srcset generation
echo '<img src="' . $image_url . '">';
For themes that output images as direct URLs rather than using WordPress image functions, the Jetpack plugin's Photon module or the picture-perfect library can retrofit srcset support without theme code changes.
Step 9 — Image SEO for WordPress
Image optimisation for WordPress speed and image SEO for WordPress rankings overlap significantly but are not identical. The SEO-specific requirements:
Alt text on every image — WordPress has an alt text field in the Media Library for every uploaded image. This is not optional for SEO — Google uses alt text to understand image content for Google Images rankings and as a text signal for the surrounding content. Keep alt text descriptive and specific — describe what the image shows, not what the article is about.
File naming before upload — WordPress uses the file name as part of the image URL. A file named image001.jpg tells Google nothing. A file named wordpress-image-optimization-settings-2026.jpg carries a weak but real keyword signal. Rename image files before uploading using descriptive, hyphenated names.
Image sitemaps — if Google Images traffic is relevant to your WordPress site, add an image sitemap. Yoast SEO and Rank Math both generate image sitemaps automatically when configured correctly. The image sitemap tells Google about images it might not discover through normal crawling.
For the complete image SEO workflow covering alt text strategy, file naming, schema markup, and structured data, the SEO image optimization checklist for developers covers every signal in detail.
Step 10 — WordPress Image Optimization Checklist
 Work through this list in order — it is organised from highest impact to lowest:
- Run PageSpeed Insights on your top 5 pages — note LCP score and image-specific opportunities
- Pre-compress hero images to under 150KB WebP using MeloTools image compressor and re-upload
- Set up WebP delivery via .htaccess, CDN, or optimisation plugin
- Audit registered image sizes — remove any sizes your theme never displays
- Add
fetchpriority="high"to your hero/LCP image - Confirm lazy loading is OFF for above-the-fold images, ON for below-the-fold
- Verify
srcsetandsizeson all images using browser inspector - Check
widthandheightattributes on all<img>elements - Add alt text to any images missing it in the Media Library
- Rename all future uploads with descriptive, keyword-relevant file names before uploading
- Move image delivery to CDN if currently serving from shared hosting
- Install an image sitemap plugin if Google Images traffic is a target
Running this checklist on a new WordPress site takes 2–3 hours. Running it on an existing site with a large image library takes longer but the impact compounds with every image fixed — a site with 500 unoptimised images that serves 10,000 visitors per month transfers approximately 2.1GB of image data daily. After optimisation that typically drops to under 600MB — a 71% reduction in server load and bandwidth cost.
Frequently Asked Questions
Should I use a WordPress image compression plugin or optimise before uploading?
Both approaches work, but optimising before uploading using a browser-based tool like MeloTools is preferable for most sites. Pre-upload compression is free, unlimited, and processes files locally without sending images to third-party servers. WordPress image compression plugins are useful for bulk-optimising existing image libraries but add ongoing plugin overhead and often require paid plans for WebP conversion.
What is the best image format for WordPress in 2026?
WebP is the best default format for WordPress images in 2026. It is 25–35% smaller than JPEG at equivalent quality, supports transparency (replacing PNG), and is supported by 96–97% of global browsers. Convert images to WebP before uploading using a free converter like MeloTools image converter — no plugin required for the conversion step itself.
Why is my WordPress site's LCP failing even after image optimisation?
The most common causes of LCP failure after basic optimisation are: the hero image has loading="lazy" applied (prevents priority loading), the hero is a CSS background image rather than an <img> element (cannot receive fetchpriority="high"), the image is served from slow shared hosting without a CDN, or the image is correctly sized but the page has render-blocking CSS or JavaScript delaying when the browser can load it. Run PageSpeed Insights and check the LCP diagnostic section for the specific cause.
How do I convert existing WordPress images to WebP?
For existing images already in the WordPress Media Library, use a plugin like ShortPixel (100 free images/month) or Imagify (20MB free/month) to bulk-convert and generate WebP versions. For new images, convert to WebP before uploading using MeloTools — drag and drop your JPEG or PNG into the image converter, select WebP, download, and upload the WebP file directly to WordPress.
Do WordPress image optimisation plugins slow down the site?
A well-configured image compression plugin should not slow down front-end loading — it processes images on upload, not on page load. However, poorly configured plugins that run image processing synchronously during upload can cause timeouts on large images, and some plugins load JavaScript on every page regardless of whether images need processing. Keep active plugins minimal and test PageSpeed Insights before and after installing any image plugin.
What image size should I upload to WordPress?
Upload images at the maximum display width used by your theme — typically 1200px for content images and 1920px for full-width hero images. Uploading larger images wastes storage and generates unnecessarily large scaled variants. For a standard blog post with a 1200px wide content area, upload a 1200px wide WebP at quality 80 — this is typically 80–180KB for a photograph and is sufficient for all display sizes including retina screens at 2×.