How to Reduce Image File Size Without Losing Quality
The assumption that reducing image file size always means reducing quality is one of the most persistent misconceptions in web publishing. It is also wrong — at least for the file size reductions that matter most for websites, email, and sharing. The reason people believe quality loss is inevitable is that they have experienced bad compression: aggressive settings, wrong formats, or over-processed files that introduce visible artefacts.
This guide explains why quality loss happens, when it does not have to happen, and exactly how to reduce image file size without losing quality using the right combination of format, compression level, and preparation.
Why Reducing Image Size Does Not Have to Mean Losing Quality
The relationship between file size and visual quality is not linear. Moving from quality 100 to quality 90 in a JPEG file produces roughly a 40–50% file size reduction with virtually no visible difference at standard display sizes. Moving from quality 90 to quality 80 produces another 20–30% reduction — again, imperceptible at normal screen resolutions. The visible quality degradation only becomes noticeable at very low quality settings — typically below quality 60 for photographs.
This means there is a large window of compression where image compression no quality loss is functionally achievable — meaning the reduction in quality is below the threshold of human perception. The skill is knowing where that window ends for each image and stopping before you cross it.
Three variables control where that threshold sits for any given image:
1. The image content. Flat-colour graphics, logos, and illustrations tolerate much higher compression than photographs. A PNG logo can be compressed to quality 60 with no visible change. A detailed photograph at quality 60 may show subtle artefacts in complex areas. Content type determines how much you can compress before quality becomes an issue.
2. The output format. JPEG applies compression differently than WebP, which applies it differently than PNG (which uses lossless compression only). WebP at quality 80 produces a smaller file than JPEG at quality 80 while maintaining equivalent or better visual output. Switching format is often the most impactful single action available — the same quality at a significantly smaller file size.
3. The display size. An image displayed at 600px wide on a screen does not benefit from being stored at 4000px wide. Oversize images are the single most common cause of unnecessarily large files. Resizing to the actual display dimensions before compressing removes pixel data that was never visible to begin with — this is not quality loss, it is accuracy.
The Best Way to Reduce Image Size — The Four-Step Method
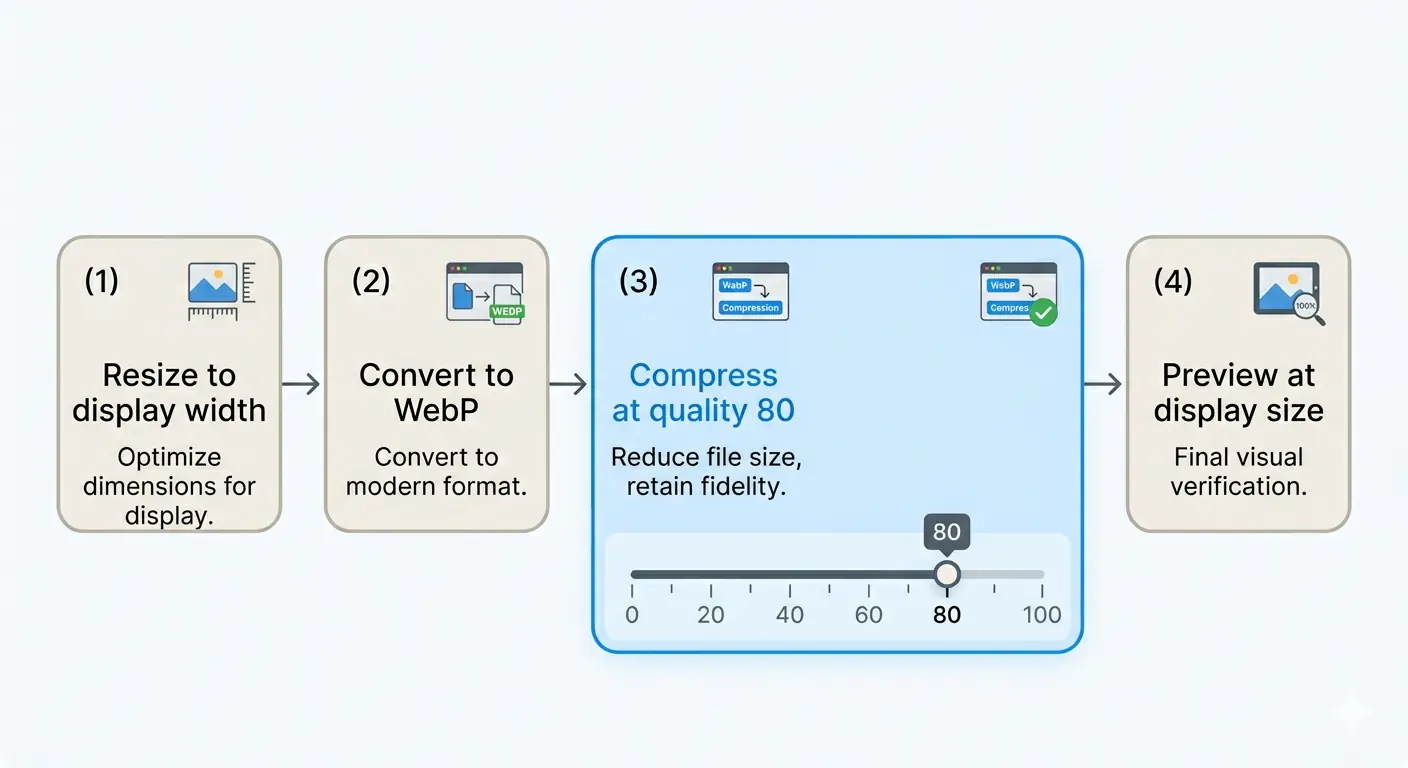
The best way to reduce image size without visible quality loss follows a specific sequence. Each step contributes differently and the order matters.
Step 1 — Resize to the actual display dimensions
Before any compression settings are touched, check whether the image is larger than it needs to be. A photograph from a modern camera is typically 4000–6000 pixels wide. A blog post column is typically 800–1200 pixels wide. Resizing from 4000px to 1200px removes approximately 91% of the total pixel data — and that data was never displayed to the reader.
File size reduction from resizing alone is substantial:
- A 4.5MB photograph at 4000×3000px → resized to 1200×900px → typically 400–700KB before any compression
- That single step produces an 85–90% file size reduction with zero compression and zero quality loss
Always resize to the maximum display width before compressing. If the image is used in multiple contexts at different sizes, resize to the largest display size.
Step 2 — Switch to a more efficient format
Format selection is the second variable that most people skip. If an image is currently a JPEG, converting it to WebP at the same quality setting produces a file 25–35% smaller with no perceptible quality difference. If it is a PNG graphic that does not require transparency, converting to lossy WebP at quality 80 can reduce it by 60–80%.
Format recommendations for reducing file size without quality loss:
| Source format | Recommended conversion | Typical size reduction |
|---|---|---|
| JPEG photograph | WebP (lossy, quality 80) | 25–35% smaller than JPEG |
| PNG photograph | WebP (lossy, quality 80) | 60–80% smaller than PNG |
| PNG graphic with transparency | Lossless WebP | 26% smaller than PNG |
| PNG graphic without transparency | WebP (lossy, quality 75–80) | 50–70% smaller than PNG |
| Large HEIC from iPhone | WebP (lossy, quality 80) | 30–50% smaller than HEIC |
Step 3 — Apply compression at the right quality setting
With the image resized and converted to the most efficient format, apply compression. The correct starting point is quality 80 for photographs and quality 85–90 for images where sharpness matters — charts, screenshots, diagrams, UI screenshots.
Quality 80 in WebP format produces output that is visually indistinguishable from the original at normal viewing conditions for the vast majority of photographic content. At this setting, the compression algorithm is discarding image data that falls below the threshold of human visual perception — the information removed is genuinely invisible.
For the compress photo without losing quality goal specifically — quality 80 is the number. Below quality 70, subtle artefacts may appear in highly detailed areas of complex photographs. Below quality 60, visible degradation is likely for most photographic content.
Step 4 — Test at the actual display size before publishing
The final step is the one most people skip: view the compressed image at the actual size it will be displayed, not at 100% zoom. An image that shows subtle compression artefacts when viewed at full resolution in an editing application looks perfectly sharp when displayed at 800px wide on a webpage. Zoom out to the actual display size and evaluate quality at that scale — not at the original resolution.
If the image looks sharp at the display size, the compression is successful regardless of what the file size reduction percentage says.
How to Reduce Image File Size Without Losing Quality — Using MeloTools
MeloTools image compressor applies compression entirely in your browser with no file uploads. The processing happens locally on your device using the browser's built-in image codec — files never leave your device, making it safe for client images, proprietary assets, and any content with data handling restrictions.
The workflow:
- Go to melotools.com/tools/image-compression
- Drag and drop your image — supports JPG, PNG, WebP, and AVIF up to 5MB
- Select the Balanced preset (80%) as the starting point — this is quality 80, the recommended default for reduce image size without quality loss
- Check the before/after preview and the output file size displayed in the results
- If the preview looks sharp at normal viewing size — download
- If you need a smaller file and the quality still looks good — try the Aggressive preset (60%)
- If quality is not acceptable at Aggressive — the image needs to be resized before compression
The before/after slider in the compression results lets you verify quality directly in the tool before downloading. A 1.2MB JPEG at quality 80 in WebP format typically produces a 380–520KB output — a 57–68% reduction with no visible quality difference at normal display sizes.
For format conversion alongside compression — converting a PNG to WebP before compressing — use the MeloTools image converter first, then compress the WebP output.
The Difference Between Lossless and Lossy Compression
Understanding the two compression types clarifies when quality loss is impossible versus when it requires careful management.
Lossless compression removes redundant data without discarding any image information. Every pixel in the output is identical to every pixel in the input — the file is simply packaged more efficiently. PNG uses lossless compression. Lossless WebP uses lossless compression. The output is pixel-perfect by definition — image compression no quality loss is guaranteed, not approximate.
The limitation of lossless compression is that the file size reduction is modest for photographic content — typically 10–30% compared to an uncompressed source. For photographs, lossless compression alone is rarely sufficient to produce web-ready file sizes.
Lossy compression permanently removes image data — typically the data that contributes least to perceived visual quality, such as fine colour gradients in smooth areas, imperceptible detail in shadow regions, and high-frequency noise. The compression algorithm makes judgements about which data is genuinely invisible at normal viewing conditions and discards it.
The key distinction is that "lossy" does not mean "visibly degraded." At quality settings between 75 and 90, the data being discarded is genuinely below the threshold of human visual perception for most image content. The term describes a technical process, not the visible result.
Shrinking Image File Size for Specific Use Cases
For website images: Use WebP format, resize to maximum display width, compress at quality 80. A hero image should be under 150KB. A blog post featured image should be under 200KB. A product photo should be under 120KB. These targets are achievable without visible quality loss for any photograph when the format and resize steps are applied first.
For email campaigns: Use JPEG (for photographs) or PNG (for graphics) — WebP support in email clients remains inconsistent in 2026. Resize to 600px wide (standard email column width), compress at quality 75–80 for photographs. Target under 100KB per image for reliable deliverability across email platforms.
For social media: Most platforms recompress uploaded images automatically — upload at the highest quality they accept rather than pre-compressing aggressively. Instagram accepts up to 8MB, Facebook up to 4MB. Upload at quality 90–95 and let the platform apply its own compression. Pre-compressing too aggressively before a platform recompresses doubles the quality loss.
For portfolio and photography sites: Compress at quality 85–90 where visual fidelity matters most. The tradeoff between page load speed and image quality is more visible to audiences who are specifically evaluating image quality — a photography portfolio viewer is scrutinising images in a way a blog reader is not.
For a complete breakdown of how to hit specific KB targets — 100KB, 200KB, or any platform-defined limit — the guide to compress image to specific KB covers the iterative workflow for any size target.
What Causes Visible Quality Loss — and How to Avoid It
Visible quality loss in compressed images has four common causes, all avoidable:
Re-compressing an already-compressed image. Every time a JPEG is saved at a lossy quality setting, data is permanently discarded. Compressing the same JPEG twice compounds the degradation from both operations. Always compress from the original source file — never re-compress a previously compressed output. Store original uncompressed files separately.
Compressing at too low a quality setting. Below quality 60 for photographs, visible blockiness appears in smooth areas and fine detail degrades noticeably. Start at quality 80 and only go lower if the file size target requires it — and verify quality visually before publishing.
Compressing an oversized file instead of resizing first. A 4000px image compressed to 200KB has lost significantly more quality than a 1200px image compressed to the same 200KB. The same file size budget applied to fewer pixels means each pixel is encoded more accurately. Always resize before compressing.
Using the wrong format for the content type. Saving a line drawing, logo, or screenshot as a lossy JPEG introduces visible compression artefacts even at high quality settings — because JPEG's block-based compression algorithm is poorly suited to flat-colour graphics with sharp edges. Use lossless formats (WebP lossless or PNG) for graphics and logos, lossy formats for photographs.
Understanding these four causes means you can avoid them systematically rather than guessing at compression settings. The complete guide to image compression without quality loss covers the technical detail behind each compression algorithm for teams that need to apply this at scale.
Frequently Asked Questions
Can you reduce image file size without losing any quality at all?
Yes — using lossless compression. Lossless WebP and PNG compression produce output that is pixel-identical to the source with no data discarded. For photographs, lossless compression typically reduces file size by 10–30%. For graphics, logos, and flat-colour images, lossless compression can achieve 40–70% reduction. For photographs requiring larger reductions, lossy compression at quality 80+ produces output that is visually indistinguishable from the original at normal display sizes.
What quality setting should I use to compress photos without losing quality?
Quality 80 is the recommended setting for photographs. At quality 80 in WebP format, the compression discards image data below the threshold of human visual perception — the output looks identical to the original at normal screen viewing conditions. Only go below quality 75 if the file size target cannot be reached at 80, and verify visually at the actual display size before publishing.
What is the best way to reduce image file size for a website?
Resize the image to the maximum display width first (typically 800–1200px for content images), then convert to WebP format, then compress at quality 80. This three-step sequence consistently produces files 60–90% smaller than the original without visible quality loss. Use MeloTools image compressor for the compression step — it runs entirely in your browser with no file uploads.
Does changing the image format reduce quality?
Converting from JPEG to WebP at quality 80 produces output with equivalent or better visual quality at a smaller file size — the format conversion does not introduce quality loss when the quality setting is appropriate. Converting from PNG to WebP lossless produces pixel-identical output — no quality loss at all. Quality loss from format conversion only occurs when converting to an incompatible format (e.g. saving a flat-colour logo as a lossy JPEG).
How do I know if my compressed image has lost quality?
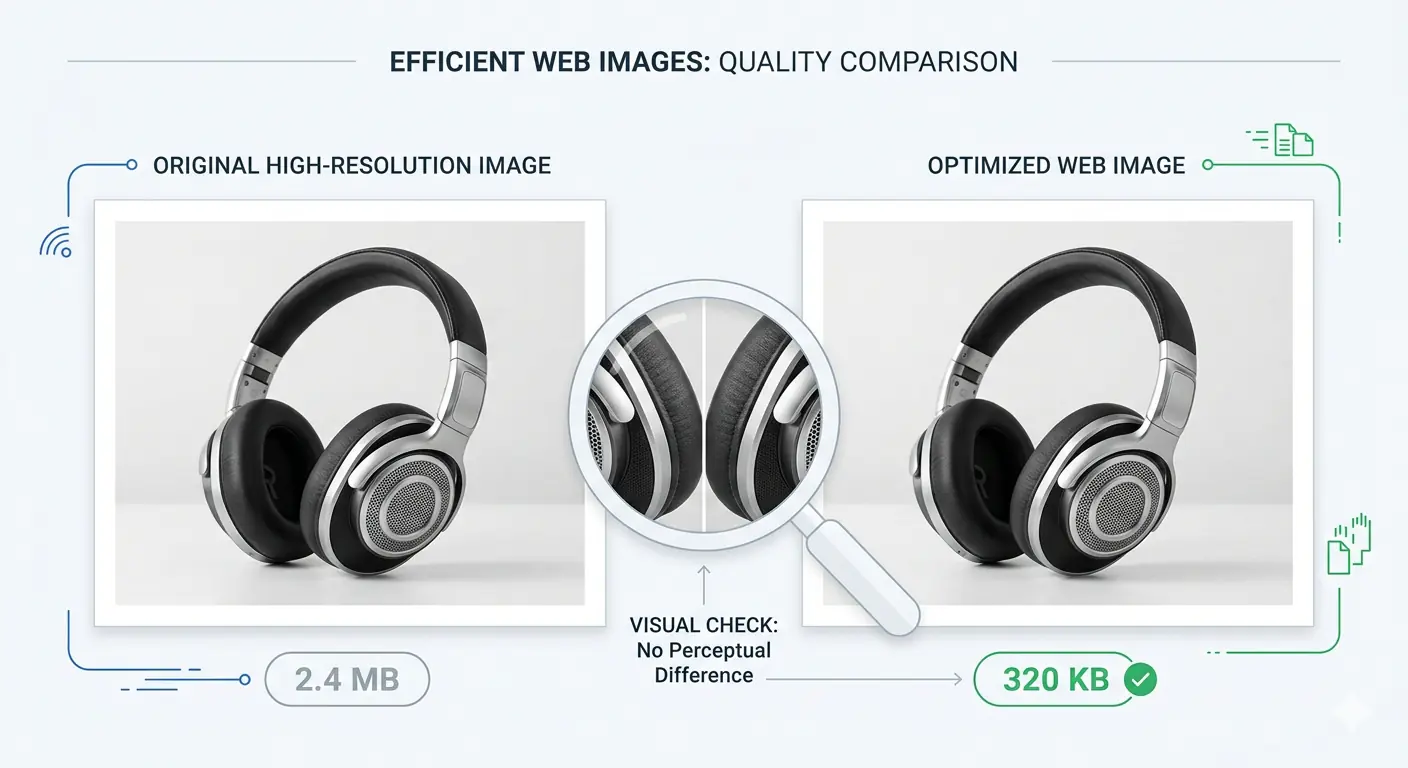
View the compressed image at the actual display size — the size it will appear on screen, not at 100% zoom in an editing application. If it looks sharp and clear at the display size, the compression is acceptable. A useful test: open both the original and compressed images side by side in a browser at the display size. If you cannot identify which is which, the compression has been applied successfully without visible quality loss.