How to Compress Images Online Without Uploading Them
Most image compression tools work the same way: you select a file, it uploads to a remote server, the server compresses it, and you download the result. That workflow is so standard most people never question it. But for anyone handling client images, proprietary designs, internal marketing assets, or files that fall under data compliance policies, uploading to a third-party server is not an option.
The good news is that uploading to a server is not necessary for compression to happen. Browser-based image compression processes files entirely on your device — the same hardware running the browser tab — without sending a single byte to any remote server. This guide explains how it works, why it matters, and how to compress images online without uploading them in under a minute.
Why "No Upload" Matters More Than You Think
The privacy case for browser-based compression is straightforward. When you upload an image to a server for compression, you are trusting that server to:
- Not store your file after processing
- Not log the filename or metadata
- Not share the file with third-party analytics or ad networks
- Delete the file immediately after download
Most free compression tools make these promises in their privacy policies. Few of them are verifiable. You have no way to confirm a file was deleted, no visibility into what happens during the server-side processing window, and no control over who else has read access to the storage bucket your file temporarily occupies.
For personal holiday photos this may be an acceptable risk. For client brand assets, unreleased product photography, internal financial documents embedded in images, or any file that touches a compliance framework — GDPR, HIPAA, SOC 2, or similar — it is not.
Private image compression that runs locally eliminates this category of risk entirely. The file never leaves your device. There is no server, no storage window, no trust dependency. The compression happens in the browser's memory and is gone when the tab closes.
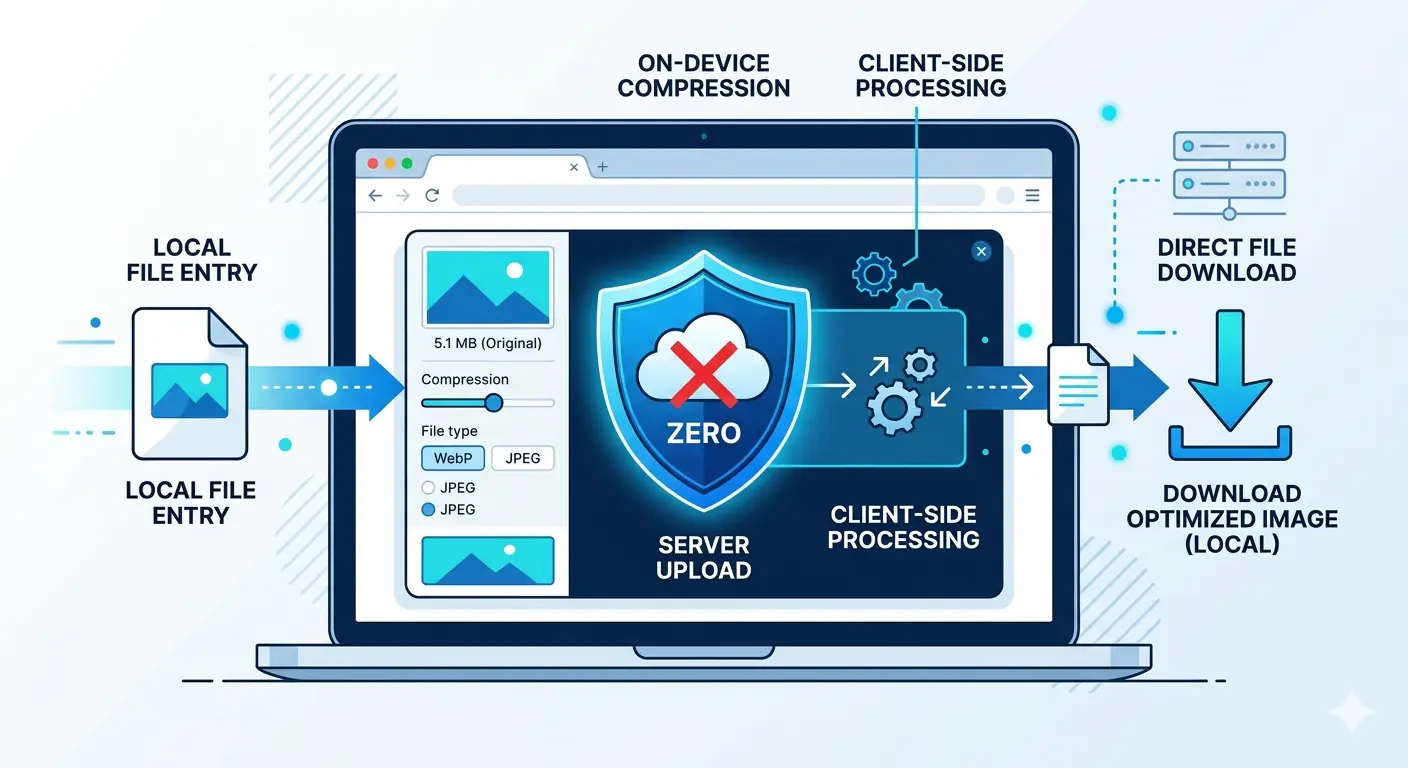
How Browser-Based Image Compression Works
 Compress images locally using the browser's built-in Canvas API — a native browser technology that has been available across all major browsers for over a decade. When you drag an image into a browser-based compression tool, the following happens entirely on your device:
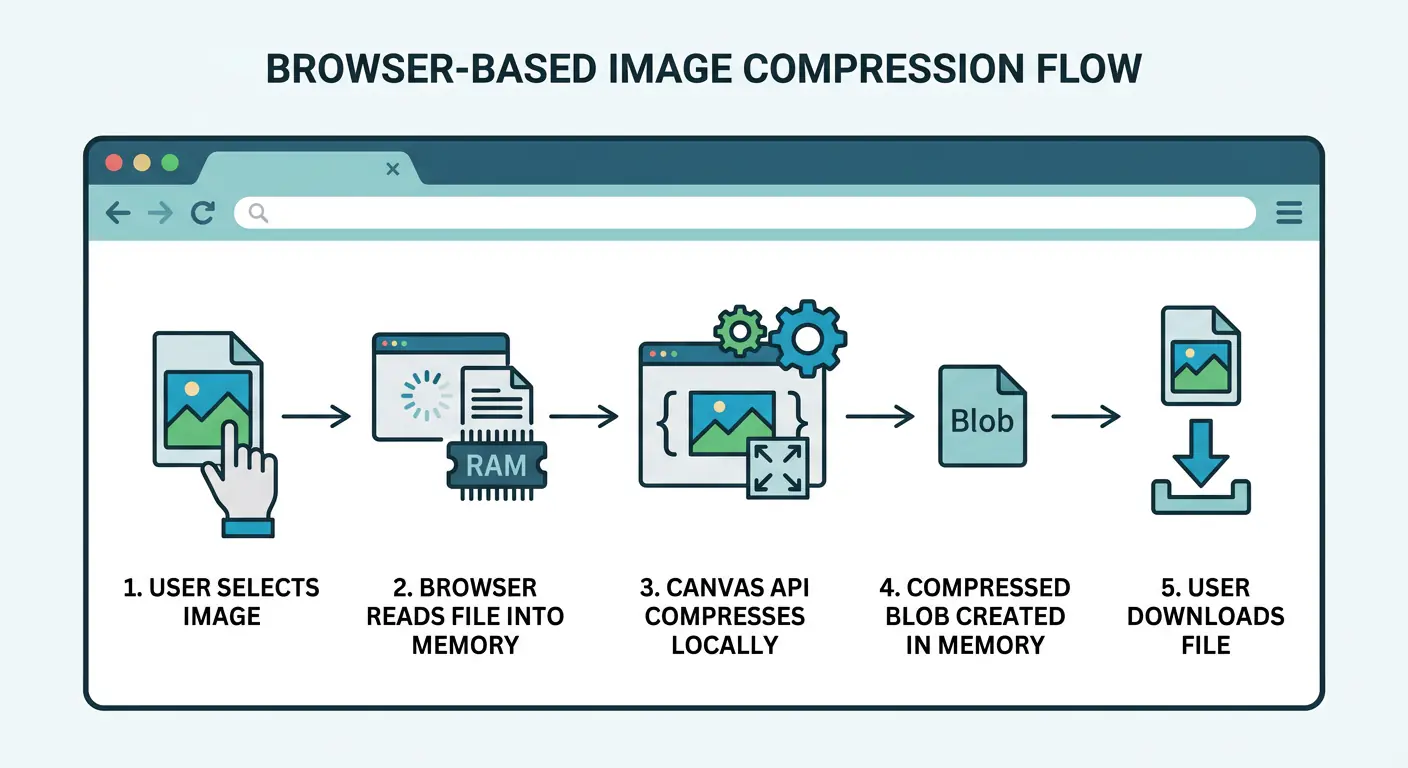
- The file is read into browser memory using the JavaScript
FileReaderAPI - The image is decoded and drawn onto an invisible HTML Canvas element
- The Canvas re-encodes the image at the specified quality level using the browser's built-in codec
- The compressed output is written to a new Blob object in memory
- A download link is created pointing to that Blob — no server involved at any stage
You can verify this yourself. Open browser DevTools (F12), go to the Network tab, and watch the activity while compressing an image in MeloTools. No upload requests appear — because no upload happens. The network tab stays silent throughout the entire compression process. This is not a privacy policy claim — it is architecturally verifiable.
How to Compress Images Online Without Uploading — Step by Step
MeloTools image compressor is a free image compressor with no upload — all processing runs locally in your browser with no account required. Here is the complete workflow:
Step 1 — Open the compressor Go to melotools.com/tools/image-compression. No login, no signup, no cookie consent wall.
Step 2 — Add your images Drag and drop up to 10 images into the upload zone, or click to browse your files. Supported formats include JPG, PNG, WebP, and AVIF. Maximum file size is 10 MB per image on the free plan.
Step 3 — Choose your compression setting Four quick presets are available:
- Minimal (95%) — smallest file size reduction, highest quality preservation. Best for hero images and LCP candidates where visual quality is non-negotiable
- Balanced (80%) — the recommended default for most web images. Produces 40–60% file size reduction with no perceptible quality difference at normal viewing sizes
- Aggressive (60%) — larger reduction suitable for thumbnails, preview images, and non-critical content
- Maximum (40%) — maximum compression for situations where file size is critical and quality is secondary
You can also set a custom quality value between 1 and 100 using the slider for precise control.
Step 4 — Download your compressed files Click Download next to each file or use Download All for batch export. Files are automatically cleared from browser memory after 30 minutes — there is nothing to delete from a server because nothing was ever sent to one.
That is the complete workflow. From file selection to compressed download takes under 60 seconds for a single image.
Comparing File Sizes: What to Expect
The compression results depend on the input image, format, and quality setting. These are real-world estimates based on typical web image content:
| Image Type | Original Size | Balanced (80%) | Aggressive (60%) | Size Saved |
|---|---|---|---|---|
| Hero photograph (JPG) | 1.2 MB | 480 KB | 280 KB | 60–77% |
| Product photo (JPG) | 800 KB | 320 KB | 190 KB | 60–76% |
| Blog graphic (PNG) | 600 KB | 260 KB | 160 KB | 57–73% |
| Screenshot (PNG) | 400 KB | 180 KB | 110 KB | 55–73% |
| WebP image | 350 KB | 160 KB | 95 KB | 54–73% |
For most web publishing workflows — blog posts, landing pages, product pages, email campaigns — the Balanced preset at quality 80 is the correct default. It consistently delivers files 40–60% smaller than unoptimised originals with no visible quality degradation at standard display sizes.
Who Needs Private Image Compression
Browser based image compression is not just a privacy preference — for specific use cases it is the only acceptable approach.
Agencies and freelancers handling client work Client images belong to the client. Uploading them to a third-party server without explicit consent may violate your client agreement and, in some jurisdictions, data protection law. Compressing images locally means you never need to obtain permission or disclose the tooling used.
Marketing and content teams with brand controls Unreleased campaign images, pre-launch product photography, and internal brand assets frequently carry pre-release restrictions. A free image compressor no upload approach keeps those assets off external servers until the intended publish date.
Developers working with staging or internal assets Screenshots of internal dashboards, staging environment previews, and admin panel graphics are sometimes processed for documentation or communication. These images often contain information that should not leave the company network. Compressing images without server dependency removes that risk.
Healthcare, legal, and financial professionals Images embedded in documents — scanned forms, medical photography, financial statement screenshots — may fall under HIPAA, legal privilege, or financial data regulations. Client-side compression is the only approach that keeps these files fully within the handling party's control.
Anyone using public or shared networks On a public WiFi network, a corporate network with monitoring, or a shared device, uploading sensitive images to a compression service creates an additional exposure window. Browser based image compression eliminates that window entirely.
MeloTools vs Upload-Based Compression Tools
The table below compares the key characteristics of client-side and server-side compression approaches:
| Feature | MeloTools (browser-based) | Server-based tools |
|---|---|---|
| File uploaded to server | Never | Always |
| Processing location | Your device | Remote server |
| Privacy verification | DevTools Network tab | Trust policy only |
| Account required | No | Often yes |
| Batch compression | Yes — up to 10 images | Varies |
| Quality presets | 4 presets + custom slider | Varies |
| Speed | Instant (local CPU) | Depends on network + server load |
| Cost | Free | Free tier + paid plans |
| GDPR / compliance safe | Yes — no data transfer | Depends on provider's data handling |
The one genuine limitation of browser-based compression is processing power. For very large batches — hundreds of high-resolution images — local CPU processing is slower than a dedicated server. For typical web publishing volumes of 1–20 images, the speed difference is not perceptible and the privacy advantage is significant.
Compress Images Locally as Part of Your Publishing Workflow
The most effective way to use browser-based compression is as a fixed step in your content publishing workflow rather than an occasional tool. Here is a practical workflow for blog and content teams:
Before uploading any image to your CMS:
- Export from your design tool (Figma, Canva, Photoshop) at the highest quality
- Open MeloTools image compressor
- Drop all images for the post into the compressor
- Apply the Balanced preset (80%) for photographs, Minimal (95%) for hero images
- Download all compressed files
- Upload the compressed versions to your CMS
This workflow takes 2–3 additional minutes per post and consistently reduces total page weight by 50–70%. For a blog post with 5 images averaging 1 MB each, this reduces image payload from 5 MB to approximately 2 MB — a difference of 2–3 seconds in load time on a median mobile connection.
That load time difference directly affects bounce rate, session duration, and Core Web Vitals LCP scores — all of which influence both user experience and search rankings.
For teams publishing frequently, this workflow integrates naturally alongside understanding which image format is best for each use case — format selection and compression work together, not independently.
What Happens to Your Files
When you use MeloTools to compress images without server interaction, the following is true by architecture — not just by policy:
- Your files are read into browser memory when you select them
- All processing happens using the browser's native Canvas API on your device
- The compressed output is written to a temporary Blob URL in browser memory
- No data is transmitted to any external server at any point
- Files are cleared from browser memory after 30 minutes, or immediately when you close the tab
- There are no cookies, session identifiers, or file metadata associated with your compressed images
You can confirm this at any time by monitoring the Network tab in browser DevTools while compressing. No upload requests, no API calls with file data, no outbound connections carrying image content.
This is what compress images without server architecture means in practice — not a privacy claim, but a technical reality that is independently verifiable by anyone with a browser and two minutes.
Frequently Asked Questions
Does browser-based compression produce the same quality as server-side tools?
Yes. Browser-based compression uses the same JPEG, WebP, and PNG codecs that server-side tools use — they are built into the browser engine. The quality at any given compression setting is equivalent. The only difference is where the processing happens.
Can I compress images in bulk without uploading?
Yes — MeloTools supports up to 10 images per batch on the free plan. Drop all images simultaneously, apply a single quality setting across all of them, and download compressed versions individually or all at once.
Is browser-based compression safe for client images?
Yes. Files processed in MeloTools never leave your device. No data is transmitted to any server, making it safe for client assets, proprietary images, and any content where data handling restrictions apply. Verify independently via browser DevTools Network tab.
What file formats does MeloTools compress?
MeloTools compresses JPG, PNG, WebP, and AVIF files. For format conversion alongside compression — for example, converting a PNG to WebP and compressing in the same step — use the image converter which also runs entirely in the browser.
What is the maximum file size I can compress without uploading?
The free plan supports files up to 10 MB per image. Premium increases this to 75 MB per image for larger source files such as high-resolution photography and print-quality exports. Both plans process files locally — the size limit is a browser memory constraint, not a server upload limit.
Will compressing images improve my Core Web Vitals?
Yes, directly. Image compression reduces file size which reduces load time for your largest above-the-fold image — the Largest Contentful Paint (LCP) element. Faster LCP scores improve Core Web Vitals, which is a Google search ranking signal. The guide to image optimization and Core Web Vitals covers the full technical relationship between file size and LCP scores.