Wix Image Optimization: What Wix Does Automatically and What You Must Do Yourself
Wix image optimization is a topic that confuses a lot of site owners, because Wix genuinely does more image work behind the scenes than most platforms. But "more than most" is not the same as "everything you need." Understanding exactly where Wix's automatic handling ends and where your responsibility begins is the difference between a fast, high-scoring site and one that still fails Core Web Vitals despite using a fully managed platform.
This guide draws a clear line. First, it covers what Wix handles automatically and how well it does it. Then it covers what Wix cannot do for you, and the specific pre-upload steps that make the biggest difference to Wix page speed images, LCP scores, and real-world visitor experience.
TL;DR
- Wix automatically resizes, compresses, and converts images to AVIF or WebP on delivery. It also applies lazy loading by default and serves images via a global CDN.
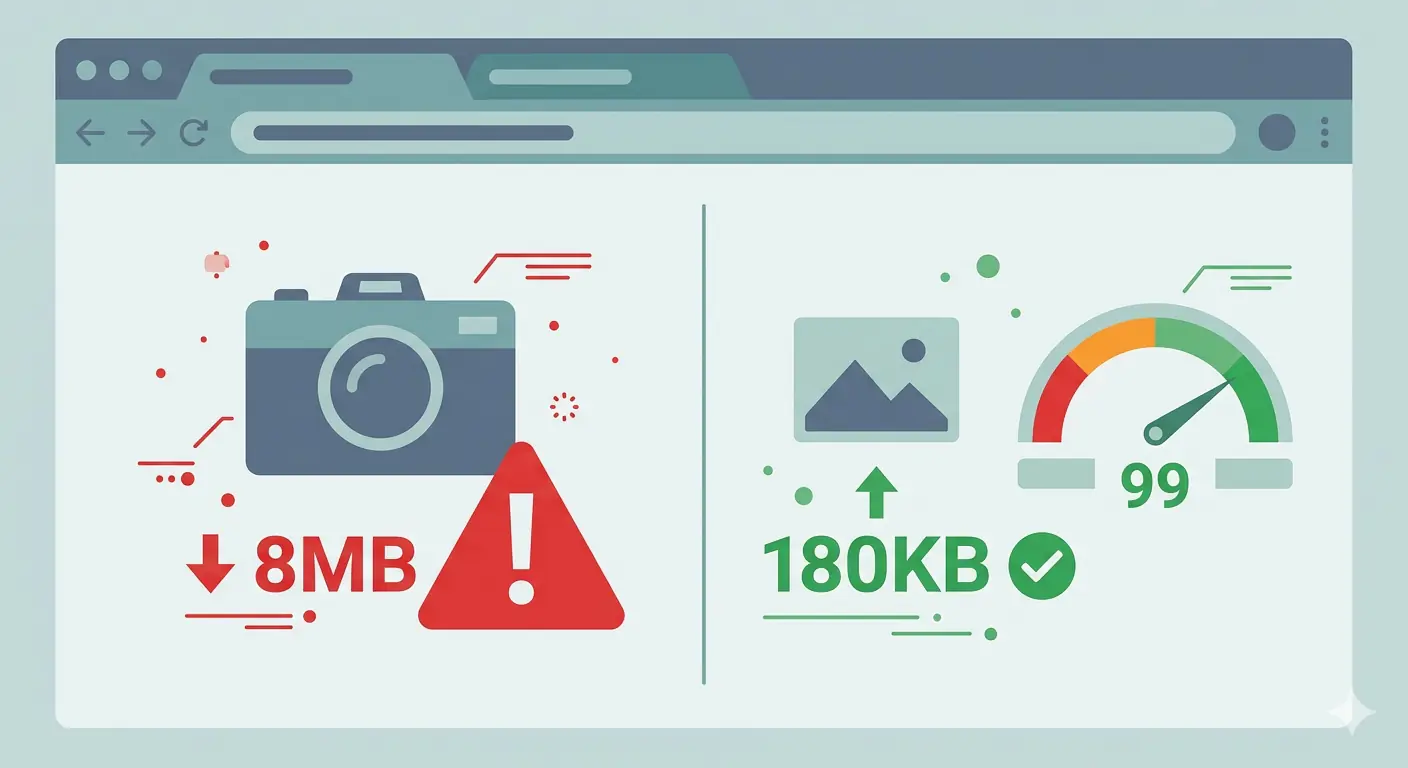
- Despite these strong defaults, Wix sites can still have image-related performance problems. The root cause is almost always source file quality: what you upload matters.
- Wix's image size limit is 25MB per file. Just because you can upload that size does not mean you should. For best performance, keep uploaded files under 1MB, and ideally under 200KB for most image types.
- Pre-upload compression using a browser-based tool like MeloTools removes the weight Wix's automated system would otherwise have to compensate for.
- Image SEO on Wix — alt text, file names, structured data — is entirely your responsibility. None of it is automated.
What Wix Does Automatically
Wix has invested significantly in image infrastructure. According to the HTTP Archive Web Almanac 2025, Wix sites load a median of only 194KB of image data on mobile — significantly lower than WordPress at 1,250KB or Squarespace at 1,511KB. That performance comes from a system of automatic optimizations that runs on every Wix site, regardless of what plan you are on.
Automatic Format Conversion: AVIF and WebP
This is Wix's most significant image optimization feature, and it has recently gotten better. Wix now automatically converts and serves your images in AVIF format when a visitor's browser supports it. AVIF is approximately 50% smaller than WebP and up to 80% smaller than a standard JPEG, with no visible quality loss at typical web compression levels. Browser support for AVIF is now universal across Chrome, Firefox, and Safari.
When AVIF is not supported (legacy browsers or specific rendering contexts), Wix falls back to WebP delivery. Wix WebP images have been part of the platform's optimization stack for several years and continue to serve as the fallback format for browsers that do not yet support AVIF.
What this means in practice: you can upload a JPEG to Wix and it will typically be delivered to your visitors as an AVIF or WebP file, sized appropriately for their device, without you touching a single setting.
Automatic Responsive Resizing
When you upload an image, Wix's servers generate multiple resized variants and serve the most appropriate one based on the visitor's screen resolution, viewport size, and device pixel ratio. A visitor on a mobile phone with a 375px wide screen does not receive the same image file as someone on a 1920px desktop display.
This responsive delivery is meaningful. It prevents the common problem of serving a 2400px hero image to a mobile visitor who only needs 750px of resolution, which is one of the most frequent causes of oversized image payloads in Lighthouse audits.
Lazy Loading
Wix applies lazy loading to images below the fold by default. Images outside the initial viewport are deferred and only downloaded when they approach the visible area as the user scrolls. This reduces initial page weight, improves Time to Interactive, and is the correct behavior for most images on most pages.
CDN Delivery
All Wix images are served through a global content delivery network. The CDN caches images on servers distributed around the world and delivers each file from the node geographically closest to the visitor. This reduces latency on every image request, independent of the file size.
What Wix Does Not Handle Automatically
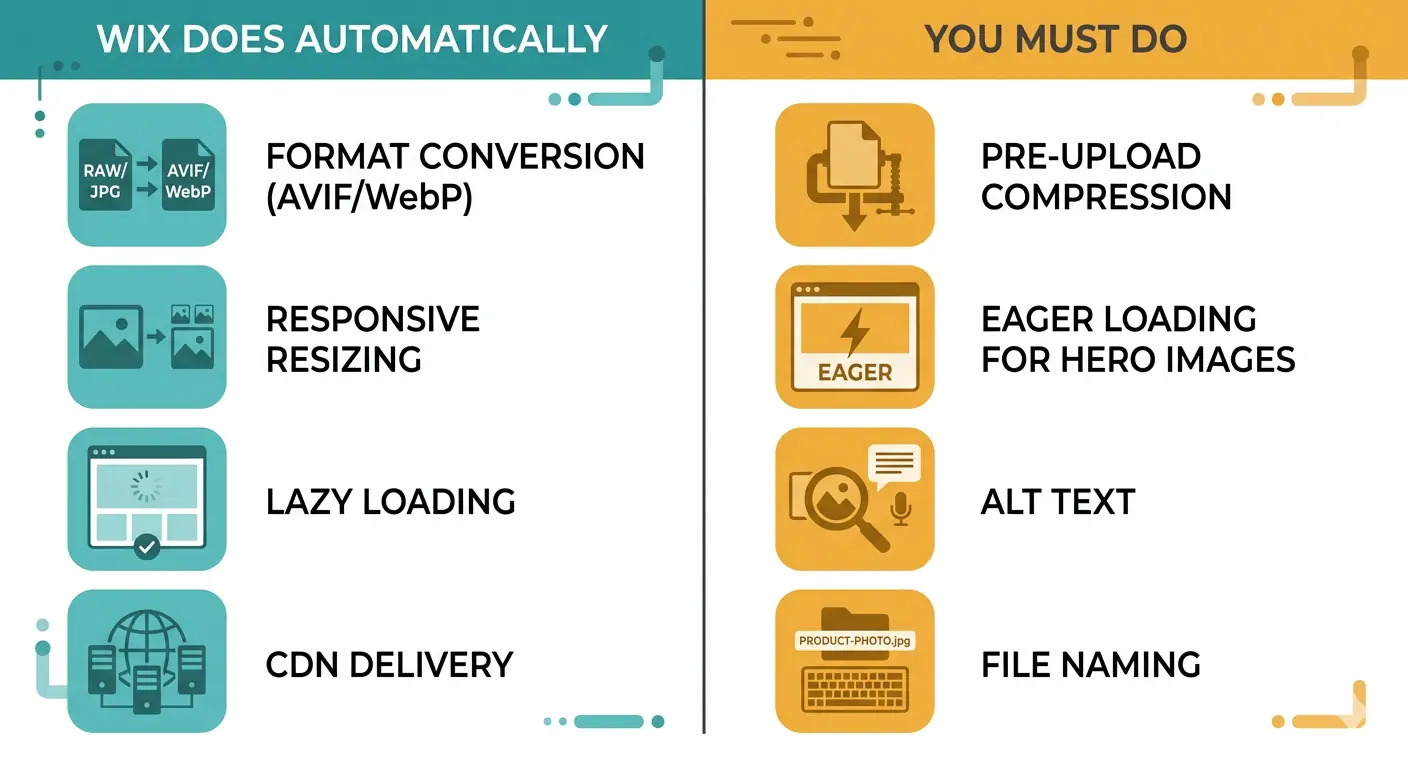 Despite these strong defaults, several categories of image problems remain outside Wix's automated optimization:
- Source file weight: Wix compresses and converts images on delivery, but a 15MB RAW photo upload creates a processing burden and often produces a larger delivered file than a pre-compressed source. The automatic system works best when starting from an already-optimized input.
- LCP image configuration: Wix applies lazy loading to all images. That includes your hero image, which is almost always the Largest Contentful Paint element. Lazy loading the LCP image delays its download and directly degrades your LCP score.
- Alt text and image SEO: Wix does not generate alt text. No platform does this correctly at scale. It is your responsibility for every image on every page.
- File naming: Wix does not rename files on upload. A file named
IMG_20240312_094521.jpggoes into your media library as that name, with no SEO value in the file path. - Background section images: Images set as backgrounds on Wix sections may not receive the same responsive treatment as inline images. Mobile visitors may receive a larger file than necessary for background images.
- Wix Blog and CMS images: Images added inline to blog posts through the editor require the same pre-upload discipline as any other image. The blog editor does not enforce upload size limits at the contributor level.
The Wix Image Size Limit: What You Need to Know
Wix's image size limit is 25MB per uploaded file. This is one of the most generous upload limits in any website builder. It is also the source of one of the most common performance problems on Wix sites.
Because the limit is generous, many users upload images directly from their phone camera or DSLR export without any preprocessing. A DSLR JPEG at full resolution might be 8 to 12MB. A smartphone photo can easily exceed 5MB. Both are within Wix's limit and will upload successfully.
Wix will compress and resize these on delivery. But the compression Wix applies is a general-purpose process designed to work across millions of images. It does not know your specific quality targets, it cannot evaluate whether a particular photograph is better compressed with a slightly lower quality setting, and it cannot guarantee the output will be under 200KB for a given display context.
The practical benchmark: for most Wix images, the target file size before upload is under 500KB, and under 200KB for thumbnails, blog featured images, and team/staff photos. Full-width hero images can go up to 1MB if the image complexity requires it, but anything above that should be compressed before uploading.
These thresholds exist because Wix's automatic compression works most effectively when the source file is already close to the optimal weight. Think of it as giving the system better raw material to work from, rather than asking it to compensate for an 8MB starting point.
The Pre-Upload Workflow for Wix
The five steps below represent the full pre-upload workflow for Wix images. Following them consistently is what separates a Wix site with 90+ Lighthouse scores from one that passes the visual review but fails Core Web Vitals.
Step 1: Identify the Display Dimensions for Each Image
Check your Wix editor at all breakpoints — desktop, tablet, and mobile — and note the maximum width at which each image is displayed. This is your target pixel dimension.
For a full-width section hero image, the maximum display width is typically 1920px on desktop. A sidebar image or team photo might display at 400px on desktop and 320px on mobile. There is no reason to upload an image wider than its maximum display dimension.
For retina displays, a 2x multiplier is appropriate for important images: if a thumbnail displays at 400px, a 800px source file handles retina rendering without overshooting. For less critical images, 1x is often sufficient.
Step 2: Resize Before You Compress
Resize to your target dimensions first. Compressing a 4000px image and then relying on Wix to deliver it at 400px wastes both file size and processing time. Resize first, then compress.
MeloTools' browser-based image resizer handles this in-browser with aspect ratio locking, so your images cannot be accidentally distorted. It works without uploading files to any server, which matters when the images are client photos, proprietary products, or any content under a data handling policy.
Step 3: Compress to a Quality Target
After resizing, compress the image to hit the file size benchmark for its use case.
Photography and hero images: 75 to 85 percent quality in WebP or JPEG. The visual difference between 85% and 100% quality is imperceptible at web viewing distances but can halve the file size.
Product images and portfolio work: 80 to 90 percent quality. Zoom in to inspect edges and fine detail after compressing. If you see banding or blur at 100% zoom, increase the quality target slightly.
Graphics, logos, and flat-color images: WebP lossless or PNG. Lossy compression on flat graphics produces color banding at hard edges that is immediately visible and impossible to recover after upload.
Blog featured images and staff photos: Under 150KB. These images are high-frequency across a site and compound quickly — 50 blog posts with 400KB featured images adds 20MB to your site's cumulative image payload.
MeloTools' image compression tool runs entirely in-browser with per-format quality controls. For batches of Wix CMS or blog images, the batch compression tool processes multiple files simultaneously with consistent settings, which is the only practical way to maintain quality uniformity across a large media library.
Step 4: Choose the Right Format
Wix will convert your uploaded images to AVIF or WebP on delivery, but uploading in the correct format still matters for two reasons: it gives Wix a better starting point, and it ensures you have control over the quality setting rather than relying on Wix's default compression level.
WebP is the recommended upload format for most Wix images in 2026. Uploading WebP means Wix is starting from an already-modern format. For browsers that support AVIF (which is now universal), Wix will re-encode to AVIF for delivery. For older contexts, the WebP source is already optimal.
SVG should be used for all vector content: logos, icons, and decorative shapes. Wix supports SVG natively. An SVG logo is typically under 10KB and renders perfectly at any resolution without any format conversion needed.
PNG remains appropriate for images with transparency that cannot be served as SVG. Keep PNG for UI element screenshots and assets where hard-edge transparency is required and WebP lossless compression would introduce unacceptable color banding.
Use MeloTools' PNG to WebP converter to convert existing PNG assets before they enter your Wix media library. The converter runs in-browser, preserves transparency in WebP lossless mode, and lets you verify the output visually before it goes anywhere near your site.
Step 5: Name Your Files for SEO
Wix does not rename uploaded files. Whatever filename you use becomes the filename in your media library. This is your only opportunity to provide a meaningful image file name that contributes to image SEO.
Use descriptive, hyphenated filenames that include the subject and context. Instead of IMG_4892.jpg, use blue-running-shoes-womens-size-8.jpg. Google uses file names as a signal in image search ranking. For business sites and e-commerce in particular, descriptive filenames across a product catalog produce measurable image search traffic over time.
Wix Page Speed Images: The LCP Problem
Wix page speed images have one issue that the platform's automatic optimization does not address out of the box: lazy loading on the LCP element.
Your LCP element is the largest image visible without scrolling. On most Wix pages it is the hero image in the first section. Lazy loading tells the browser to defer downloading images until they approach the viewport. Applying this behavior to the LCP element delays its download, and therefore its render time, directly causing LCP to fail.
In Wix, you can disable lazy loading on specific images. Select the image element in the Wix editor, open the image settings panel, and toggle off lazy loading for your hero image. Set every hero image on every key page template — home, about, services, product pages — to load eagerly.
The impact of this change is typically immediate and measurable. LCP failures caused by lazy-loaded hero images often produce LCP scores of 3 to 5 seconds. Switching to eager loading on a pre-compressed hero image under 200KB routinely brings LCP into the sub-2.5 second passing range.
Alt Text and Image SEO on Wix: Fully Manual
Wix image SEO for alt text is entirely manual. No platform generates meaningful alt text automatically. Wix provides an alt text field for every image you place in the editor, and it is empty by default.
Fill the alt text field for every image on your site. Descriptive, specific alt text serves two purposes: it provides context to screen readers for accessibility compliance, and it gives search engines textual information about the image's content, which contributes to image search ranking.
For Wix blog posts, add alt text to every image in the blog editor via the image settings panel. For Wix Stores, product images have a dedicated alt text field in the product settings that should be filled with a description including the product name, color, and key attribute.
For pages with many images, prioritize: hero images, product images, and images in the top content area of each page. These are the images most likely to appear in image search results and most likely to be encountered by screen reader users navigating your page.
Wix Core Web Vitals: What Images Control
Wix Core Web Vitals performance is substantially determined by image decisions, even on a platform with strong automatic optimization. The three metrics most affected by images are:
Largest Contentful Paint (LCP): Measures how long the largest visible element takes to render. Target: under 2.5 seconds. Pre-upload compression of the hero image combined with eager loading is the single most effective LCP improvement on most Wix sites.
Cumulative Layout Shift (CLS): Measures unexpected content movement during page load. Images without defined dimensions cause layout shift when they load and push content down the page. In Wix, using the platform's native image elements (rather than embedded raw HTML) ensures dimensions are handled correctly.
Interaction to Next Paint (INP): Measures responsiveness. Large images that take time to decode block the main thread and delay interaction responses. This is most common on mobile where processing power is limited. Compressed source files reduce decode overhead regardless of format.
The Wix Image Optimization Checklist
Before uploading each image:
- Identify maximum display dimension across all Wix editor breakpoints.
- Resize to target dimension (2x for retina where needed) using MeloTools image resizer.
- Compress to target quality using MeloTools image compression tool.
- Convert to WebP using MeloTools PNG to WebP converter where source is PNG or JPEG.
- Verify file size hits benchmark (under 200KB for thumbnails, under 1MB for full-width heroes).
- Name the file descriptively with hyphens, no spaces, no camera-generated filenames.
In the Wix editor after uploading:
- Fill in alt text for every image element.
- Disable lazy loading on all hero images and above-the-fold images (LCP candidates).
- Use Wix's native image elements rather than background images for critical above-fold visuals wherever possible.
- For background section images, upload separate mobile-specific versions where the desktop image is significantly wider than mobile display dimensions.
After publishing:
- Run Lighthouse on key pages (home, blog post, product page) and review LCP, CLS, and INP.
- Check PageSpeed Insights for remaining image flags: "Properly size images" or "Serve images in next-gen formats."
- If LCP is above 2.5 seconds, confirm the LCP image has eager loading enabled and is under 200KB.
- Use the Wix Site Speed dashboard to identify pages with the heaviest image payloads.
Frequently Asked Questions
Does Wix automatically compress images? Yes. Wix automatically compresses and resizes images on delivery using server-side processing. It converts images to AVIF for browsers that support it, and to WebP as a fallback. It also generates responsive variants and delivers them based on the visitor's screen size and resolution. However, this automatic compression works best when the source file is already optimized. Uploading a 10MB camera JPEG gives Wix more work to do and often results in a larger delivered file than uploading a pre-compressed 200KB version of the same image. Pre-upload compression using MeloTools' image compressor ensures Wix's automatic system has the best possible starting material.
What is the Wix image size limit? Wix allows image uploads up to 25MB per file. This is generous, but it is not a performance target. For most web use cases, the practical limit you should impose on yourself is 1MB for full-width hero images and under 200KB for thumbnails, blog images, and product secondary images. The Wix image size limit exists to allow flexibility for print-quality assets and high-resolution photography, not as a guide for web image upload sizes.
Does Wix support WebP images? Yes. Wix WebP images have been part of the platform's delivery stack for several years. When a visitor's browser supports WebP but not AVIF, Wix serves the image in WebP format automatically. You do not need to upload WebP files for Wix to deliver them in WebP — Wix converts on delivery. However, uploading WebP source files gives Wix a better starting point and ensures the quality setting used in conversion is the one you chose, rather than Wix's default.
Why is my Wix site slow despite automatic image optimization? The most common cause is a large source file upload. If you uploaded images at 5MB or above without pre-compression, Wix's automatic processing is compensating for a very large starting point and the delivered output may still be heavier than optimal. The second most common cause is lazy loading on the LCP image, which delays the hero image download and fails the LCP Core Web Vitals threshold. Disable lazy loading on your above-the-fold hero images in the Wix editor. The third cause is missing alt text and poor file naming, which does not affect load speed but directly limits image SEO and accessibility.
What is the best image format to upload to Wix? WebP is the best format to upload to Wix for photographs and content images in 2026. It gives Wix a modern, compressed starting point to work from. SVG is best for logos, icons, and vector artwork. PNG remains appropriate for graphics requiring hard-edge transparency that cannot be expressed as SVG. Avoid uploading full-size JPEG files from cameras or design exports without pre-compression. Use MeloTools' PNG to WebP converter to convert source PNG files to WebP before uploading.
Do I need to add alt text manually on Wix? Yes. Wix does not generate alt text automatically. You must add it manually for every image in the Wix editor, in the alt text field that appears in the image settings panel. For Wix blog posts, add alt text in the blog editor's image settings. For Wix Stores product images, fill the alt text field in the product settings. Missing alt text is both an accessibility failure and a lost image SEO opportunity. Every image on your site should have descriptive, specific alt text that describes the image content in plain language.